The Introduction to Docker Weblogic
In this post, we are going to be exploring the quick and easy option available to get started with weblogic and Docker. In this post, we are going to see how to create a weblogic container in docker in a few easy steps.
The post's primary focus to give a big picture on how to start the weblogic container as easy as possible so that you would make your first move and change your perception that containerization is not as hard as people say or as you have pictured ( in case if you have pictured it as complex)
Without further ado, Let's walk right into the objective.
Some Prerequisites
Before we proceed, these are the few things we feel you must be having (or) done with to follow this post effectively. ( you can still read it and do the setup later. Dont rush for close button )
Docker Installation and Setup:
We presume that you have installed docker Container Engine in your Mac or Windows. they are also known as docker for mac (or) docker for windows. In case you are a linux user, I hope you are all set with your own distribution of docker
To make sure that your docker is setup correctly and it can create containers and pull images from docker hub( An Inventory/Repository of images in the cloud ). Try creating a simple "hello-world" container
aksarav@middlewareinventory:~$ docker container run "hello-world"
Unable to find image 'hello-world:latest' locally
latest: Pulling from library/hello-world
d1725b59e92d: Pull complete
Digest: sha256:0add3ace90ecb4adbf7777e9aacf18357296e799f81cabc9fde470971e499788
Status: Downloaded newer image for hello-world:latest

Hello from Docker!
This message shows that your installation appears to be working correctly.

To generate this message, Docker took the following steps:
1. The Docker client contacted the Docker daemon.
2. The Docker daemon pulled the "hello-world" image from the Docker Hub.
(amd64)
3. The Docker daemon created a new container from that image which runs the
executable that produces the output you are currently reading.
4. The Docker daemon streamed that output to the Docker client, which sent it
to your terminal.

To try something more ambitious, you can run an Ubuntu container with:
$ docker run -it ubuntu bash

Share images, automate workflows, and more with a free Docker ID:
https://hub.docker.com/

For more examples and ideas, visit:
https://docs.docker.com/get-started/
If you see the output something similiar to the preceding snippet . You are ALL OK.
User Account in Oracle
Since you are here looking to install weblogic in docker container. I can presume that you might have downloaded packages/software of Oracle such as Java (or) weblogic in the past. Then you must be well aware that the Accept the License and Oracle Single Sign-On stuff.
If not already aware, well, you are gonna get to know what is it
At this point, Please go ahead and register yourself into Oracle and create a new Oracle Account. You will need it not just for this course and for your future.
Click here to create your Oracle.com Account.
Summary of Steps:
With the Docker ready and Oracle Account in hand. Let us take a look at the steps to be performed to create the weblogic container
Here is the summary of steps we are going to be performing
- Login to container registry of Oracle container-registry.oracle.com from docker CLI
- Visit container-registry.oracle.com in the browser and accept the License
- Create a domain.properties file with Admin Username and Password.
- Start the Container with port forwarding
- Access the console at Admin port and validate.
The Execution
| Log in to Oracle Container Registry |
aksarav@middlewareinventory:~$ docker login container-registry.oracle.com
Username: [email protected]
Password:
Login Succeeded
In your terminal or docker CLI. Execute the docker login command as shown in the preceding snippet. When prompted for the username and password, Enter the Oracle Credentials you have created in the pre-requisites section.
If done right, You should get Login Succeeded Message.
| Visit container registry in the browser and Accept the License |
Step1: Point your browser to the container-registry URL
Step2: On the top right corner, you will have an option to Sign in click that
Step 3: Choose the container you are going to pull. For example, I am going with Middleware
Step 4: In the next repositories page. click on continue
Step 5: Then there will be a new modal with the License agreement. Come down to the page bottom. You will find an option to Accept or Decline
Step 6: Click Accept
| Create domain.properties file with Domain/AdminServer username and Password |
In the terminal (for mac) or windows explorer ( for windows users) Create a new directory i.e /apps/docker/oracle-weblogic and create a new file named domain.properties with the following content ( Change the values of username and password as you wish )
username=weblogic
password=weblogic1
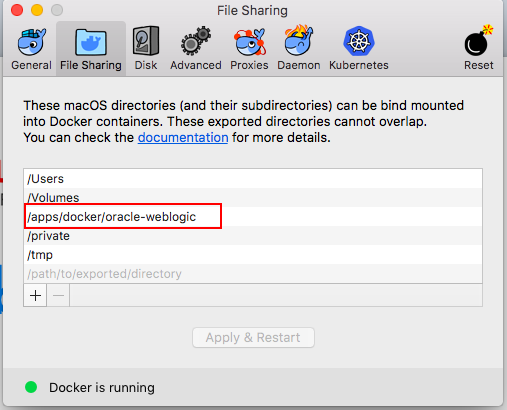
Note*: Before proceeding to the next step, be advised that it might be necessary to add the newly created directory ( /apps/docker/oracle-weblogic) into Docker File Sharing (Shared Path). by adding the directory into a Shared Path List of Docker.
You can configure shared paths from Docker -> Preferences... -> File Sharing.
Failure of configuring this "File Sharing" would result in mounting errors. ( which is covered in the video). In such cases, you would be seeing an exception similar to given below.
docker: Error response from daemon: Mounts denied:
The path /apps/docker/oracle-weblogic
is not shared from OS X and is not known to Docker.
You can configure shared paths from Docker -> Preferences... -> File Sharing.
See https://docs.docker.com/docker-for-mac/osxfs/#namespaces for more info.
| Start the Weblogic Container |
Use the docker container run command to start the weblogic container. Since the image is not locally present or being invoked for the first time. It would take some time to download the images so be advised.
docker container run -d -p 7000:7001 -p 9001:9002 -it – name wlsnode01 -v /apps/docker/oracle-weblogic:/u01/oracle/properties container-registry.oracle.com/middleware/weblogic
Explanation of the command
docker container run– Docker container run is the standard docker command to start the container especially for the first time, you can also use docker container start later once you have created it-d– detach the container, in other words, start the container in the background-p-- Port forwarding between the host and Guest OS. Here the Guest OS is Container. The Left part of the port definition (7000) always refers to the host machine, in my case MAC and the right part of the port definition (7001) represents the port runs in the container which has to be forwarded to host-it– Allocate the Terminal (TTY) id and start the container with interactive terminal support. It will let us take SSH to the container easily once started--name– Name the container as wlsnode01-v-- Volume for mounting inside the container, A shared directory between host and container. We are going to share/mount the/apps/docker/oracle-weblogicof the host os as/u01/oracle/propertiesinside the container.
If no issues, the container will start and you can list the running container using the following command
docker container list -a
If you are not seeing the container in there, you can see the logs for further troubleshooting
docker container logs <name of the container>
More docker container commands are discussed in the video.
| Access the weblogic console and Login to validate. |
Open your browser in host OS and enter the URL _http://localhost:9001/console and if everything went well. You would be able to see the weblogic server Administration console waiting for you there.
You can create machines, Managed Servers even create Vertical cluster right from the console. Explore and Enjoy it.
The Video Guide (VLOG)
I recorded myself doing the all these steps with a little voice-over in case you are looking for something practical or for visual learning. I reckon that it would be helpful
Hope it helps. If you like this post, You can leave a rating here [ratings]
Cheers,
SaravAK

Follow me on Linkedin My Profile Follow DevopsJunction onFacebook orTwitter For more practical videos and tutorials. Subscribe to our channel
Signup for Exclusive "Subscriber-only" Content


