In this article, we are going to see how to use the powerful aws s3 sync CLI command.
In the Linux world, if we want to compare two directories and copy the files on the same machine or between two machines over the remote (ssh) we use rsync
Those who have used it know how powerful it is. similarly, aws s3 sync is for the S3 bucket or S3 file system ( it is technically not a file system, it is an object store)
Now let us see some real-time use cases for the aws s3 sync command.
Where can aws s3 sync be used?
- To upload a Large directory with files to the remote S3 bucket recursively
- download a Large directory with files from S3 to local
- To compare two S3 buckets and copy files between them ( only the missing )
- compare a local directory with a remote S3 bucket and copy the missing files on the remote or vice versa
- Syncing two buckets in two different regions
- Including or Excluding files during the copy between source and destination
- To update the website content and set cache if your website hosted on S3
- Uploading files from local with different file permissions on bulk
There are more use cases of aws s3 sync than I have listed here.
While not all of them are mostly used across the industry. we will try to address some of the examples of the aws s3 sync command
Let us start with some basics
AWS CLI Installation and Configuration
For us to be able to use aws s3 sync command. we need to have the aws CLI installed and configured.
If you already have the AWS CLI installed and configured in your local. please ignore this section and move on or follow through.
Here we are trying to create a new user with full Admin access privileges for testing purposes.
You can give fewer privileges or just s3 related permissions are also fine just to try this article.
Setup your Programmatic Access – Create Access Key
If you would like to create a new user in IAM along with the Access Key follow these steps.
-
Login to AWS Console
-
In the services go to IAM
-
Create a User and Click on map existing Policies
-
Choose UserName and Select the Policy (Administrator Access Policy)
-
Create user
-
The final Stage would present the AccessKEY and Secret Access as given below.
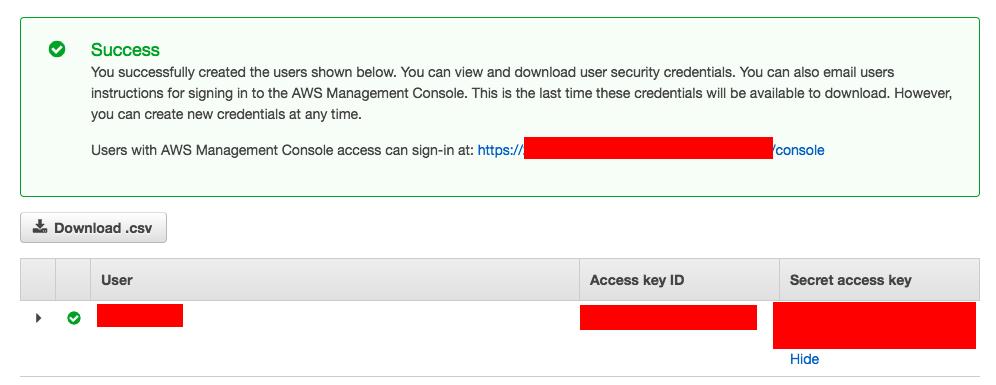
If you would like to Choose the existing user and create an Access Key follow this
- Sign in to the AWS Management Console and open the IAM console at https://console.aws.amazon.com/iam/.
- In the navigation pane, choose Users.
- Choose the name of the user whose access keys you want to create, and then choose the Security credentials tab.
- In the Access keys section, choose to create an access key.
- To view the new access key pair, choose Show. You will not have access to the secret access key again after this dialog box closes. ( Refer to the image given above)
Install AWS CLI
Based on your base machine the AWS CLI installation and command might vary.
Amazon has given clear instructions on how to install AWS CLI on each platform. Choose any of the following links and get your AWS CLI installed and ready
- AWS CLI version 2 on Linux or Unix
- AWS CLI version 2 on macOS
- Installing AWS CLI version 2 on Windows
Configure AWS CLI
I presume that you have installed the AWS CLI package and if everything went well.
You should be able to see the version of the AWS CLI installed when entering the following command in your terminal or command prompt
aws – version
I am using the AWS CLI Version1 as CLI Version 2 is still in Beta.
Now it is time to configure the AWS CLI, Just enter the following command and you would be prompted with a few questions about the Access Key and Passwords.
aws configure
it would look like this as you are setting it up.
You enter your own AWS Access Key ID and Secret Access Key and the one given below is not correct. Just a made-up.
➜ ~ aws configure
AWS Access Key ID [None]: AKIAS790KQGK63WUK6T5
AWS Secret Access Key [None]: kkQEiBjJSKrDkWBLO9G/JJKQWIOKL/CpHjMGyoiJWW
Default region name [None]: us-east-1
Default output format [None]:
Well done. You are ready with AWS CLI
AWS S3 SYNC Examples ( Local and S3 bucket )
Hope you are ready with all the necessary items to test things in practice.
Here are some examples of aws s3 sync
First, let us see how to use aws s3 sync to upload and download data. In other words, syncing the local to S3 bucket and S3 bucket to local
AWS S3 sync Local to S3 bucket - Copying/Uploading files
When you want to copy a large number of files in Linux, we always use RSYNC as it compares the existence of the files in both source and destination and copies only the files which are not present or recently modified.
rsync provides options to delete the files in case you want the sync to be perfect.
AWS S3 Sync also provides similar options too. we will get there.
For now, let us see a simple example of uploading a directory using s3 sync
I have a directory named tobeuploaded on my local and I want to sync it to the remote S3 bucket which is empty.
Let us execute the aws s3 sync command to upload the files/directories on the tobeuploaded directory to the S3 bucket recursively
⚡ aws s3 sync tobeuploaded/. s3://gritfy-s3-bucket1
You can also execute this command in another way.
⚡ cd tobeuploaded
⚡ aws s3 sync . s3://gritfy-s3-bucket1
In this example, we are cd going into that directory and syncing the file both would give the same result.
Here is the execution/implementation terminal record
After the upload, if you execute the aws s3 ls command you would see the output as shown below.
⚡ aws s3 ls s3://gritfy-s3-bucket1

2022-06-17 21:42:30 0 testfile1
2022-06-17 21:42:30 0 testfile2
2022-06-17 21:42:30 0 testfile3
If you notice, you can see the subdirectories are not being copied.
Note*: s3 sync does not consider the empty directories in both upload/download. the empty directories would not be considered at the destination if they are empty on the source.
Now, I hope you know why the subdirectories were not considered by the aws s3 sync command.
Let us create some test files in the subdirectories and re-sync.
As you can see on the preceding terminal record. the subdirectories are now copied or synced to the S3
the output of aws s3 ls with the recursive flag would yield the following result
⚡ aws s3 ls s3://gritfy-s3-bucket1 – recursive
2022-06-18 00:47:40 0 testdir1/testfile1
2022-06-18 00:47:41 0 testdir2/testfile1
2022-06-17 21:42:30 0 testfile1
2022-06-17 21:42:30 0 testfile2
2022-06-17 21:42:30 0 testfile3
Sync S3 bucket to Local - Downloading Files from S3 to local
In the previous example, we have seen in detail how to sync the local directory and files to the s3 bucket.
Now let us see how can we sync the S3 bucket to the local directory.
In other words, we can say downloading the content from the S3 bucket to local.
To sync the S3 bucket to the local, all we need to change is the order of S3 URI and the local path
Here is the recorded video of me trying to sync the S3 bucket to local
As you can see in the preceding video, Existing files would not be copied or overwritten by default
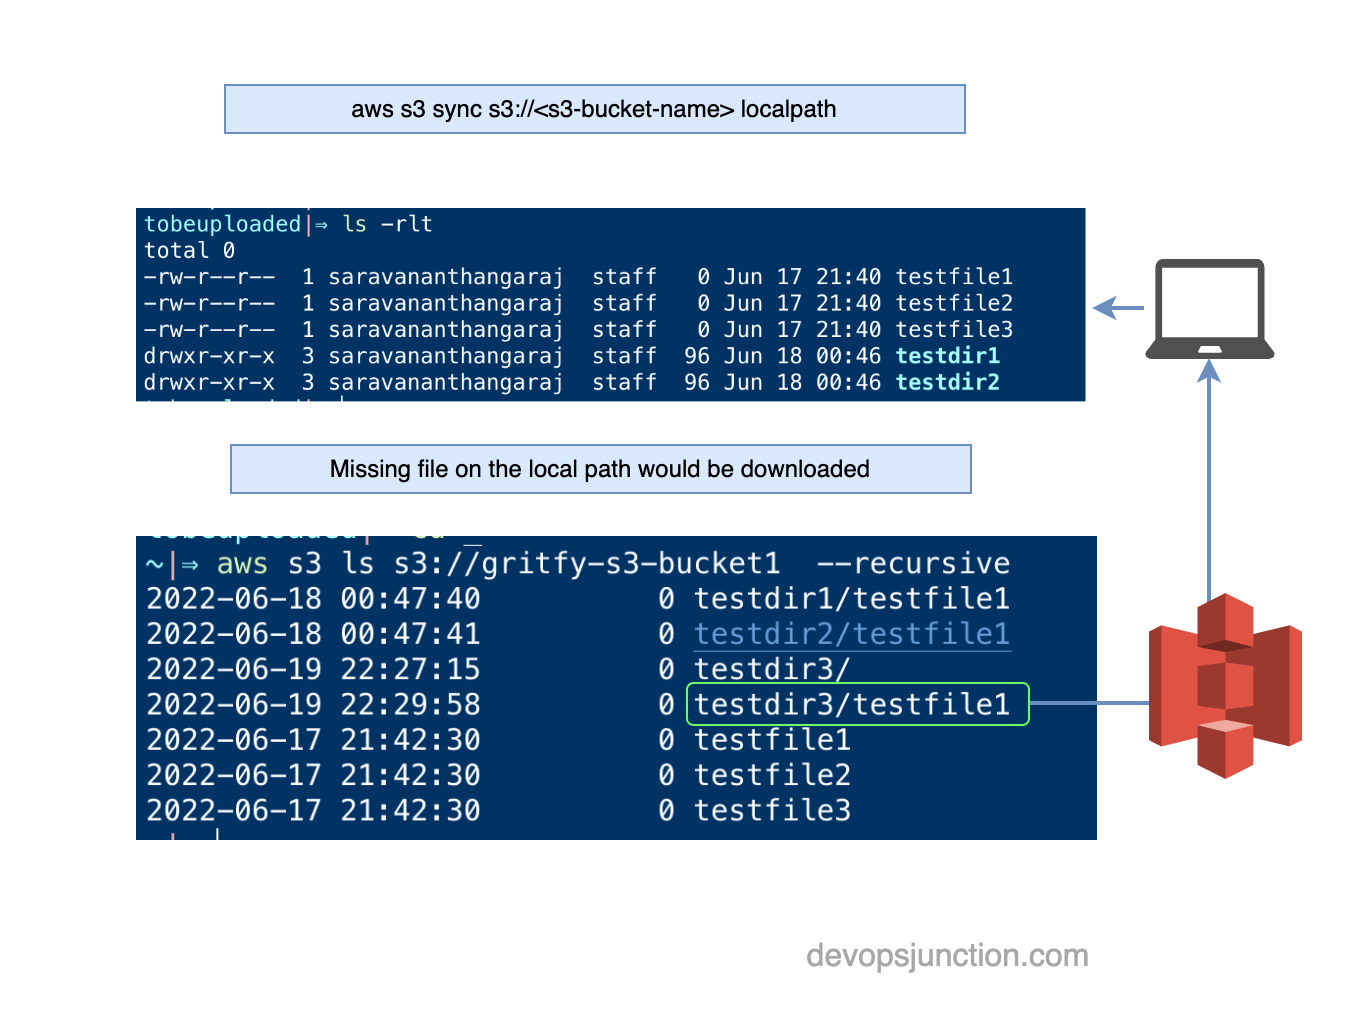
Let's suppose our local directory has these files
⚡ ls -lrt
total 0
-rw-r--r – 1 sarav staff 0 Jun 17 21:40 testfile1
-rw-r--r – 1 sarav staff 0 Jun 17 21:40 testfile2
-rw-r--r – 1 sarav staff 0 Jun 17 21:40 testfile3
drwxr-xr-x 3 sarav staff 96 Jun 18 00:46 testdir1
drwxr-xr-x 3 sarav staff 96 Jun 18 00:46 testdir2
Our S3 buckets have these files
⚡ aws s3 ls s3://gritfy-s3-bucket1 – recursive
2022-06-18 00:47:40 0 testdir1/testfile1
2022-06-18 00:47:41 0 testdir2/testfile1
2022-06-19 22:29:58 0 testdir3/testfile1
2022-06-17 21:42:30 0 testfile1
2022-06-17 21:42:30 0 testfile2
2022-06-17 21:42:30 0 testfile3
As you can see, we have an extra directory on the S3 bucket which is not present on the local path
If I sync my local path to the S3. No action would be taken as the source is our local path and the destination is an s3 bucket
⚡ aws s3 sync . s3://gritfy-s3-bucket1
If I sync the S3 bucket to my local path, In this context, the source is the S3 bucket and the destination is the local path
The missing file or directory (non-empty) on my local would be copied over from the S3
⚡ aws s3 sync s3://gritfy-s3-bucket1 .
  download: s3://gritfy-s3-bucket1/testdir3/testfile1 to testdir3/testfile1
As you can see the testdir3 is now being copied from the S3 to local.
If you are trying to sync the S3 bucket to an empty local directory, you could be able to download all the files from the S3 bucket recursively
Hope you have now understood about S3 sync and source and destination.
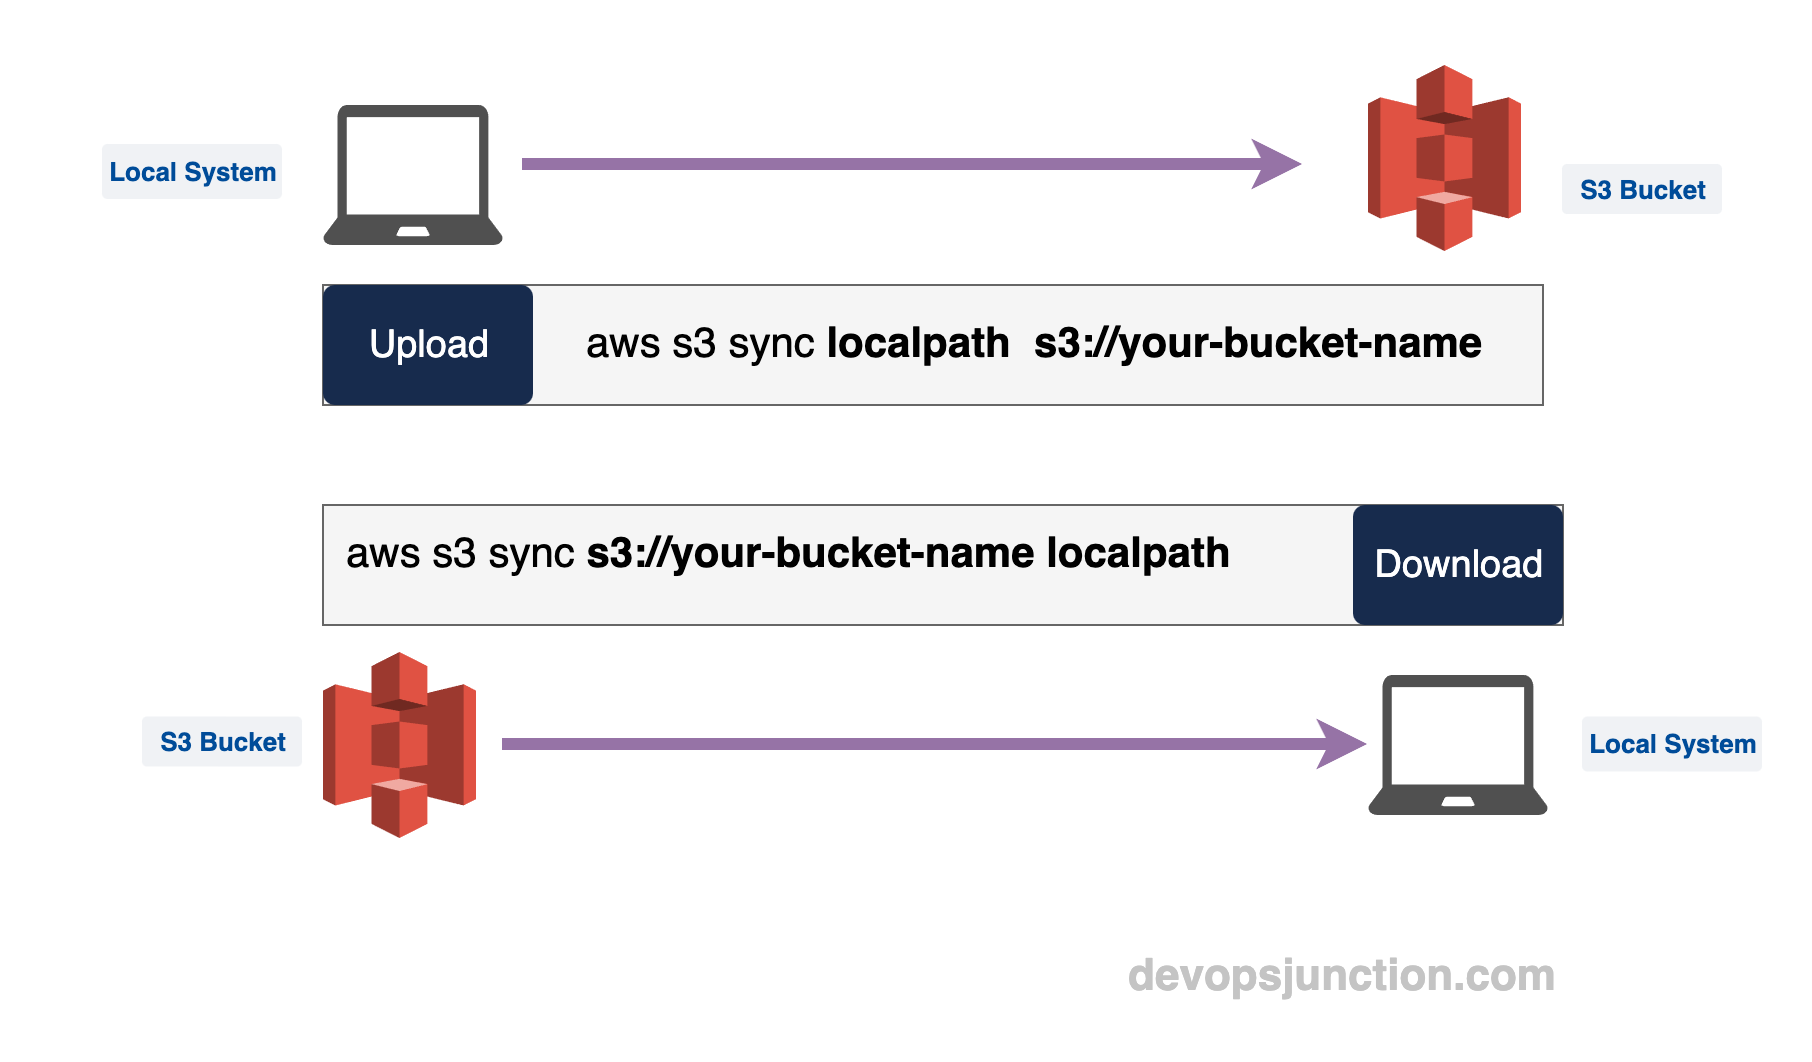
Here is the pictorial representation of what we did now.
how to upload and download with s3 sync.
Sync and delete the extra files on the S3 destination
While performing the sync, What if we want to remove some files to maintain the sync state either at the source or destination. local path or S3
Let's suppose we have a file in the S3 bucket but not on the local path.
As we have seen if we use the S3 path as the source and local path as the destination and perform the sync, the missing file would be downloaded
Let's suppose we have a file in the Local path but not on the S3 bucket
If we do a sync with the local path as a source and the S3 bucket as destination the file would be uploaded to the s3 bucket.
Now let's say we want to delete the file at the destination if the file is not present in the source.
How to do it?
You need a special option to be passed to the aws s3 sync command
--delete (boolean) Files that exist in the destination but not in the
source are deleted during sync.
Let us see it in real time
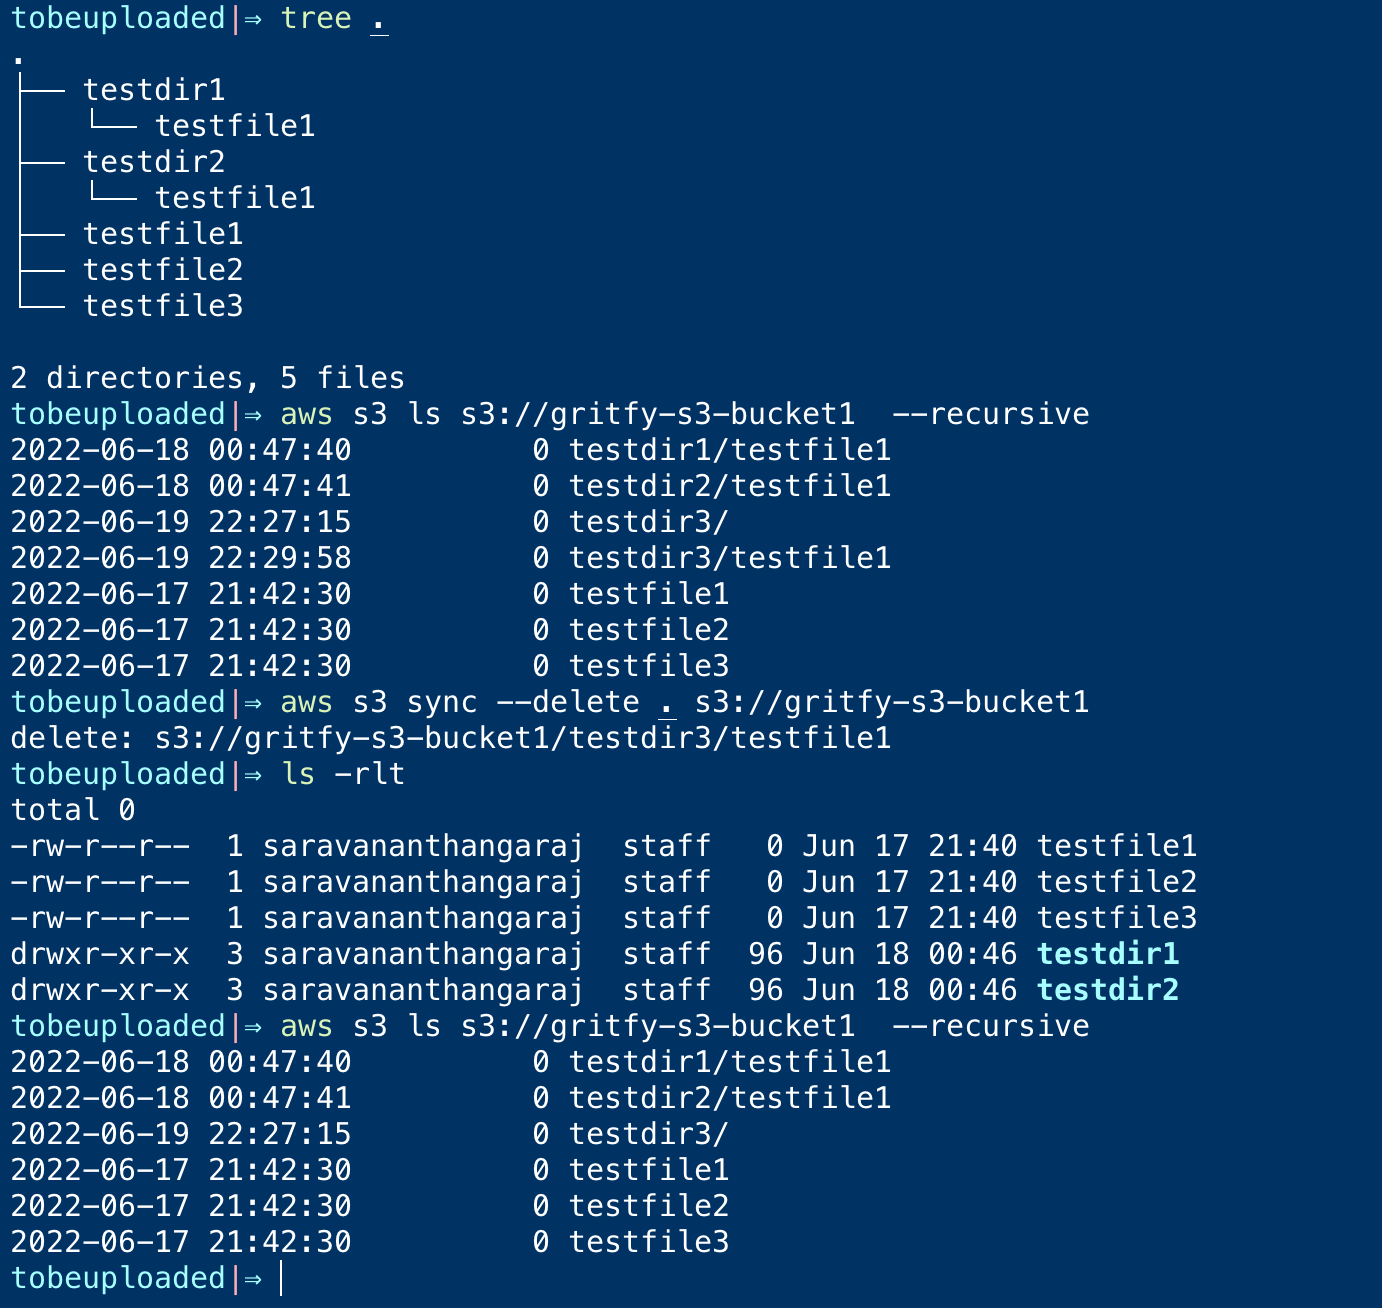
I have the local directory ( source ) with the following files
⚡ tree .
.
├── testdir1
│   └── testfile1
├── testdir2
│   └── testfile1
├── testfile1
├── testfile2
└── testfile3
I am trying to sync this local directory with a remote S3 bucket which has the following files
⚡ aws s3 ls s3://gritfy-s3-bucket1 – recursive
2022-06-18 00:47:40 0 testdir1/testfile1
2022-06-18 00:47:41 0 testdir2/testfile1
2022-06-19 22:27:15 0 testdir3/
2022-06-19 22:29:58 0 testdir3/testfile1
2022-06-17 21:42:30 0 testfile1
2022-06-17 21:42:30 0 testfile2
2022-06-17 21:42:30 0 testfile3
as you can see there is a directory named testdir3 and file inside, which is not present on the source
Let us see how to delete it on the S3 bucket.
Remember the file would be deleted only on the destination if they are not present on the source.
In our case destination is S3 bucket
In the preceding screenshot, you can see we are using the --delete flag
⚡ aws s3 sync – delete . s3://gritfy-s3-bucket1
delete: s3://gritfy-s3-bucket1/testdir3/testfile1
You can see it returns the output that the additional file which is not present on the source but the destination is deleted.
Sync and delete the extra files on the Local destination
we have seen how to delete the extra files which are present on the local but not on the destination s3 bucket
What if the destination is local and it has an extra file.
No difference except the change of destination, the --delete a flag would make sure it deletes the file on the destination irrespective of whether it is local or S3
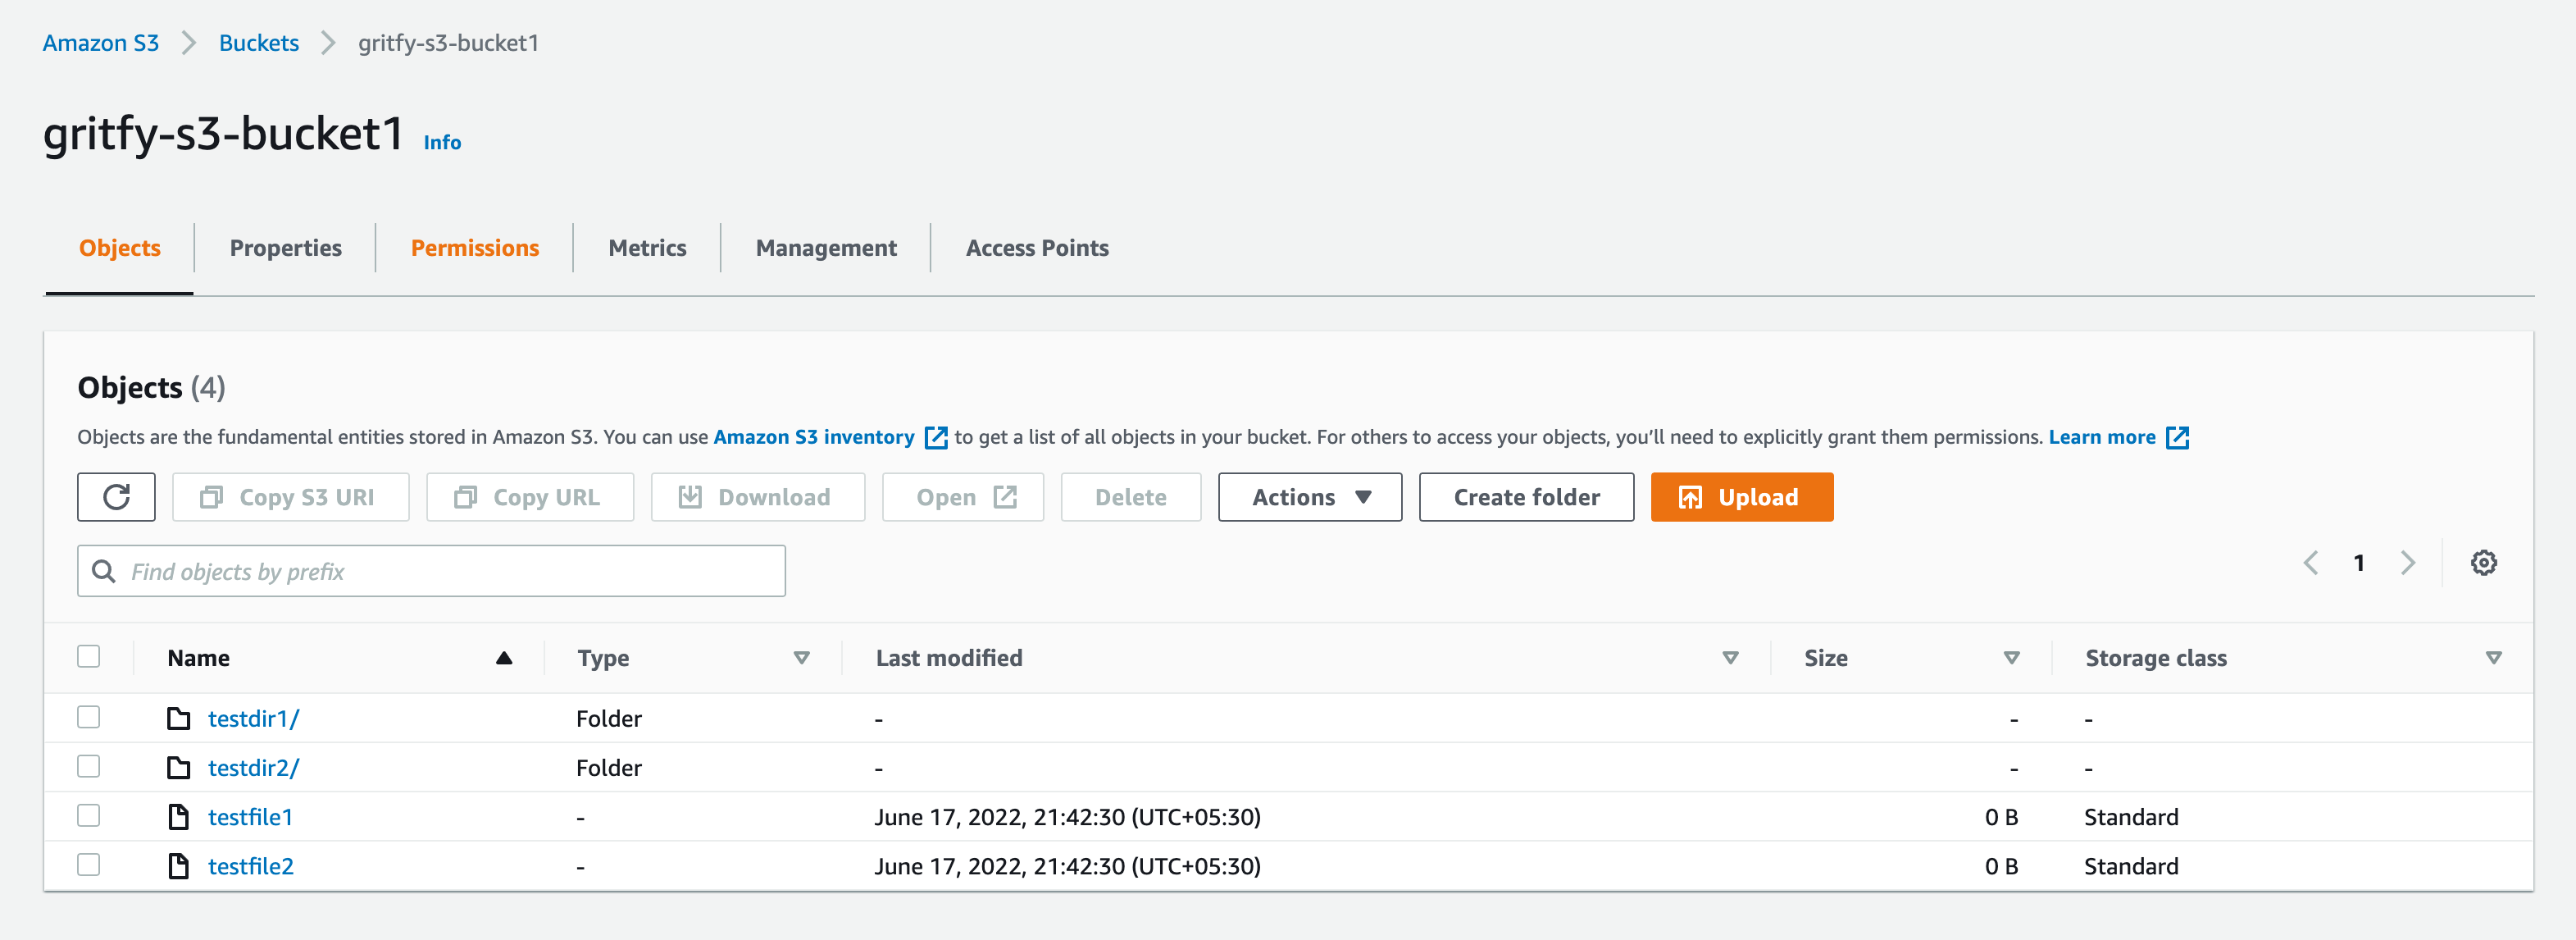
Take a look at the list of files on the S3 bucket
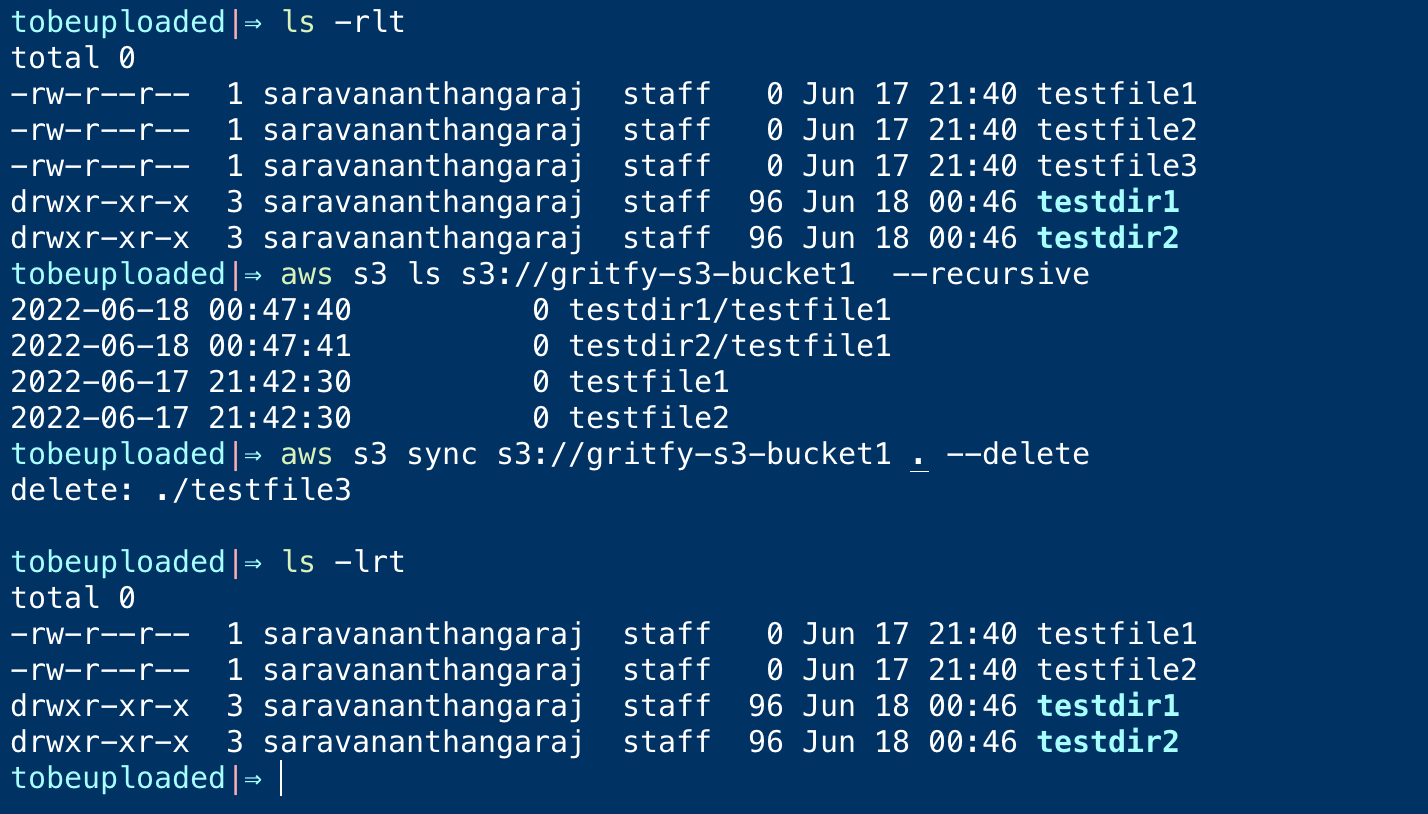
Here is the list of files on my local. let us try to sync keeping the local path as the destination
⚡ ls -rlt

-rw-r--r – 1 sarav staff 0 Jun 17 21:40 testfile1
-rw-r--r – 1 sarav staff 0 Jun 17 21:40 testfile2
-rw-r--r – 1 sarav staff 0 Jun 17 21:40 testfile3
drwxr-xr-x 3 sarav staff 96 Jun 18 00:46 testdir1
drwxr-xr-x 3 sarav staff 96 Jun 18 00:46 testdir2
as you can see the testfile3 is not present on the source ( s3 path ) but the destination (local path)
when we execute the following command. the testfile3 should be deleted from the local path
⚡ aws s3 sync s3://gritfy-s3-bucket1 . – delete
and here is the output of this command at my end when tested
as you can see the testfile3 is deleted on the local path ( destination)
AWS S3 Sync two S3 buckets
So far we have seen how to sync upload, download and delete between the local path and s3 bucket
Let us see the most important feature of comparing and syncing two S3 buckets
Just know that all the examples we have seen earlier could be replicated to the S3 buckets.
The only difference is that we are going to use two S3 buckets in both source and destination, unlike our previous examples.
Let us see examples of how to sync two s3 buckets
AWS S3 sync two s3 buckets
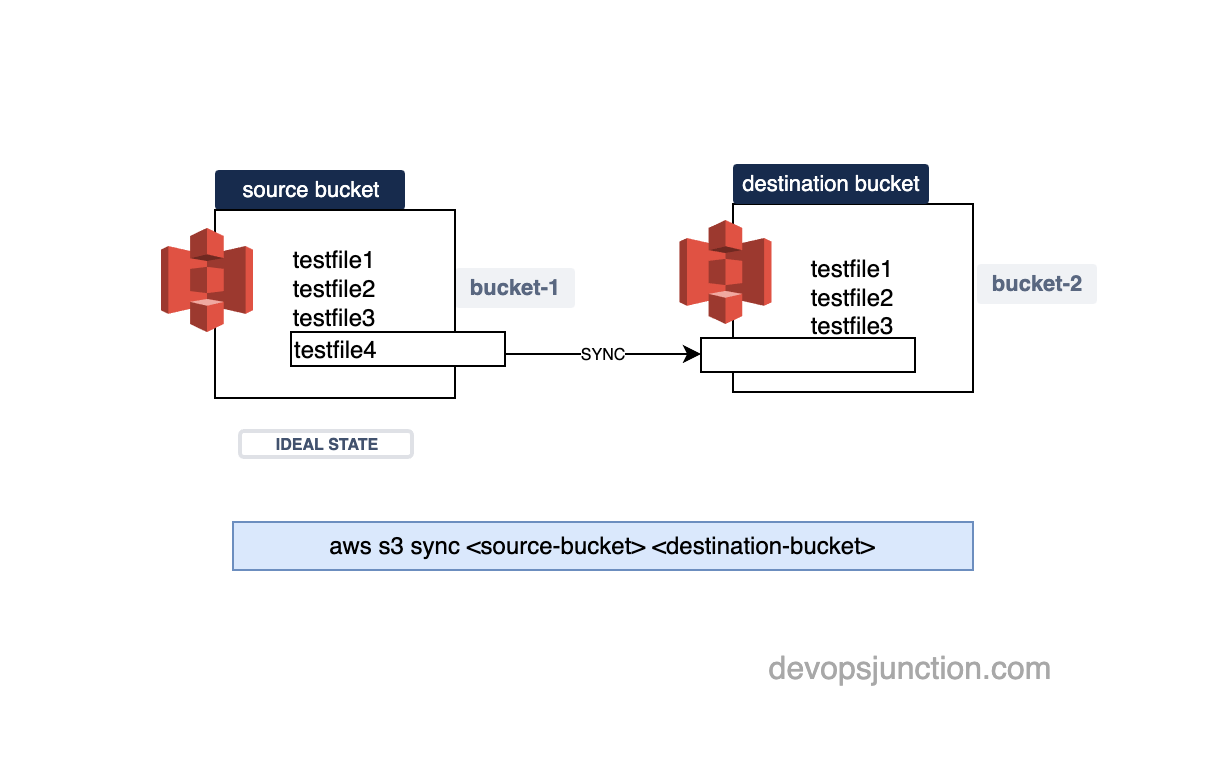
Always remember the Source and Destination play an important role while performing a Sync.
While syncing two S3 buckets, the bucket which is at the source end would be considered the ideal state and the destination would be brought to the source state
as we have mentioned the source bucket would be considered as the ideal desired state and the destination would be synced to match the source.
let us validate it once by testing it ourselves
I have two buckets.
here is the state of the first s3 bucket
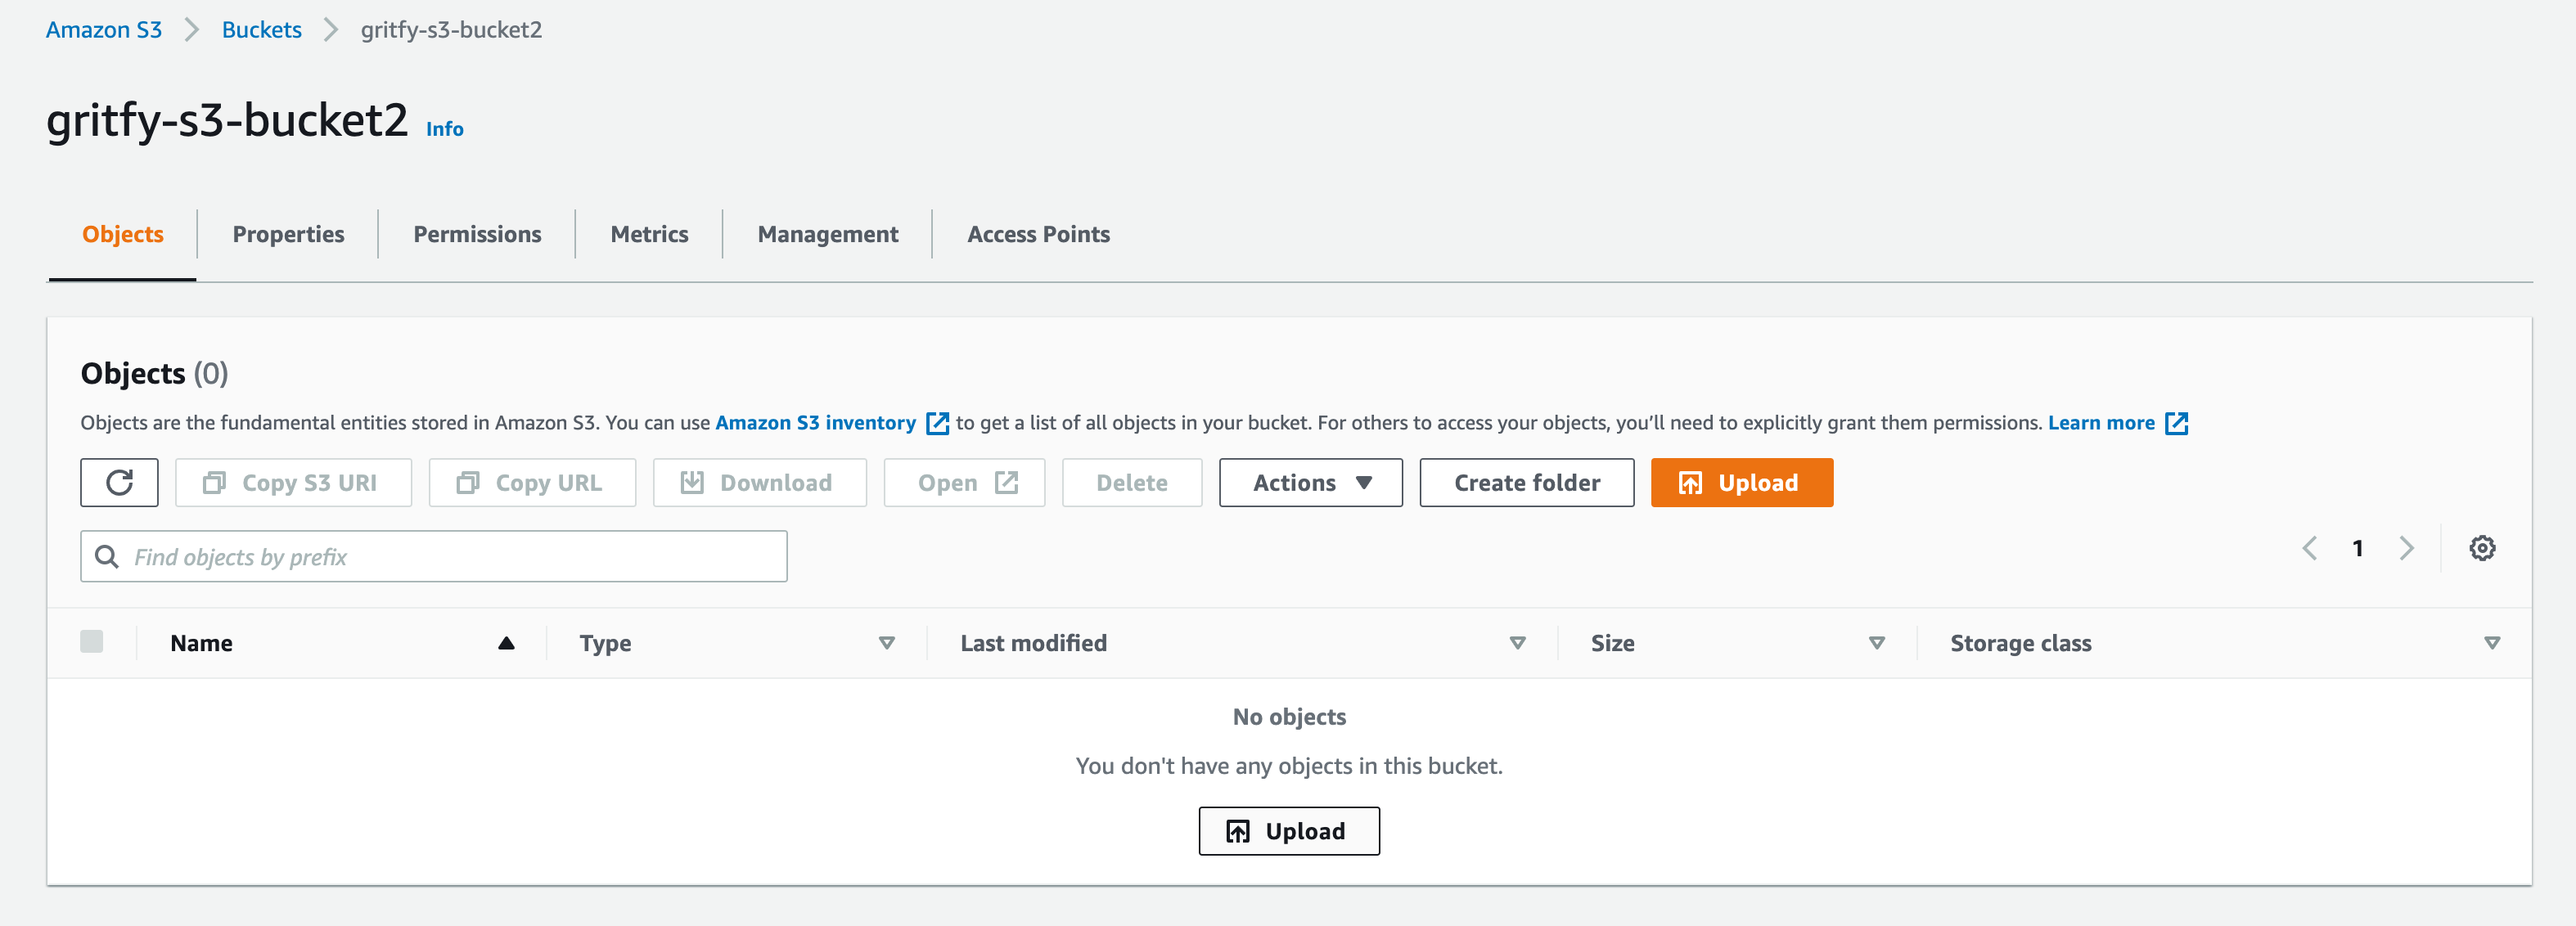
and the state of the second s3 bucket
as you can see the Second bucket gritfy-s3-bucket2 is empty.
to meet the desired state, we need to have the files created on the bucket2
⚡ aws s3 s3://gritfy-s3-bucket1 s3://gritfy-s3-bucket2
let us try to sync it. See it in action
you can see the files are copied from the source bucket to the destination bucket as the bucket 2 was not having the files on bucket1
In case you want to keep bucket2 as the ideal desired state. All you have to do is to change the source and destination
In the following command, you can see that bucket2 is now at the source and bucket1 is on the destination end.
⚡ aws s3 s3://gritfy-s3-bucket2 s3://gritfy-s3-bucket1
Remember the source is considered as the desired state and the destination would be matched to the source
AWS S3 sync two s3 buckets - Delete extra files
As we have seen earlier, we can delete the extra files/objects from the destination if they are not present on the source.
The same can be done while syncing between two S3 buckets
Let us see how it works in real time.
we will take the same buckets we have used in the previous example.
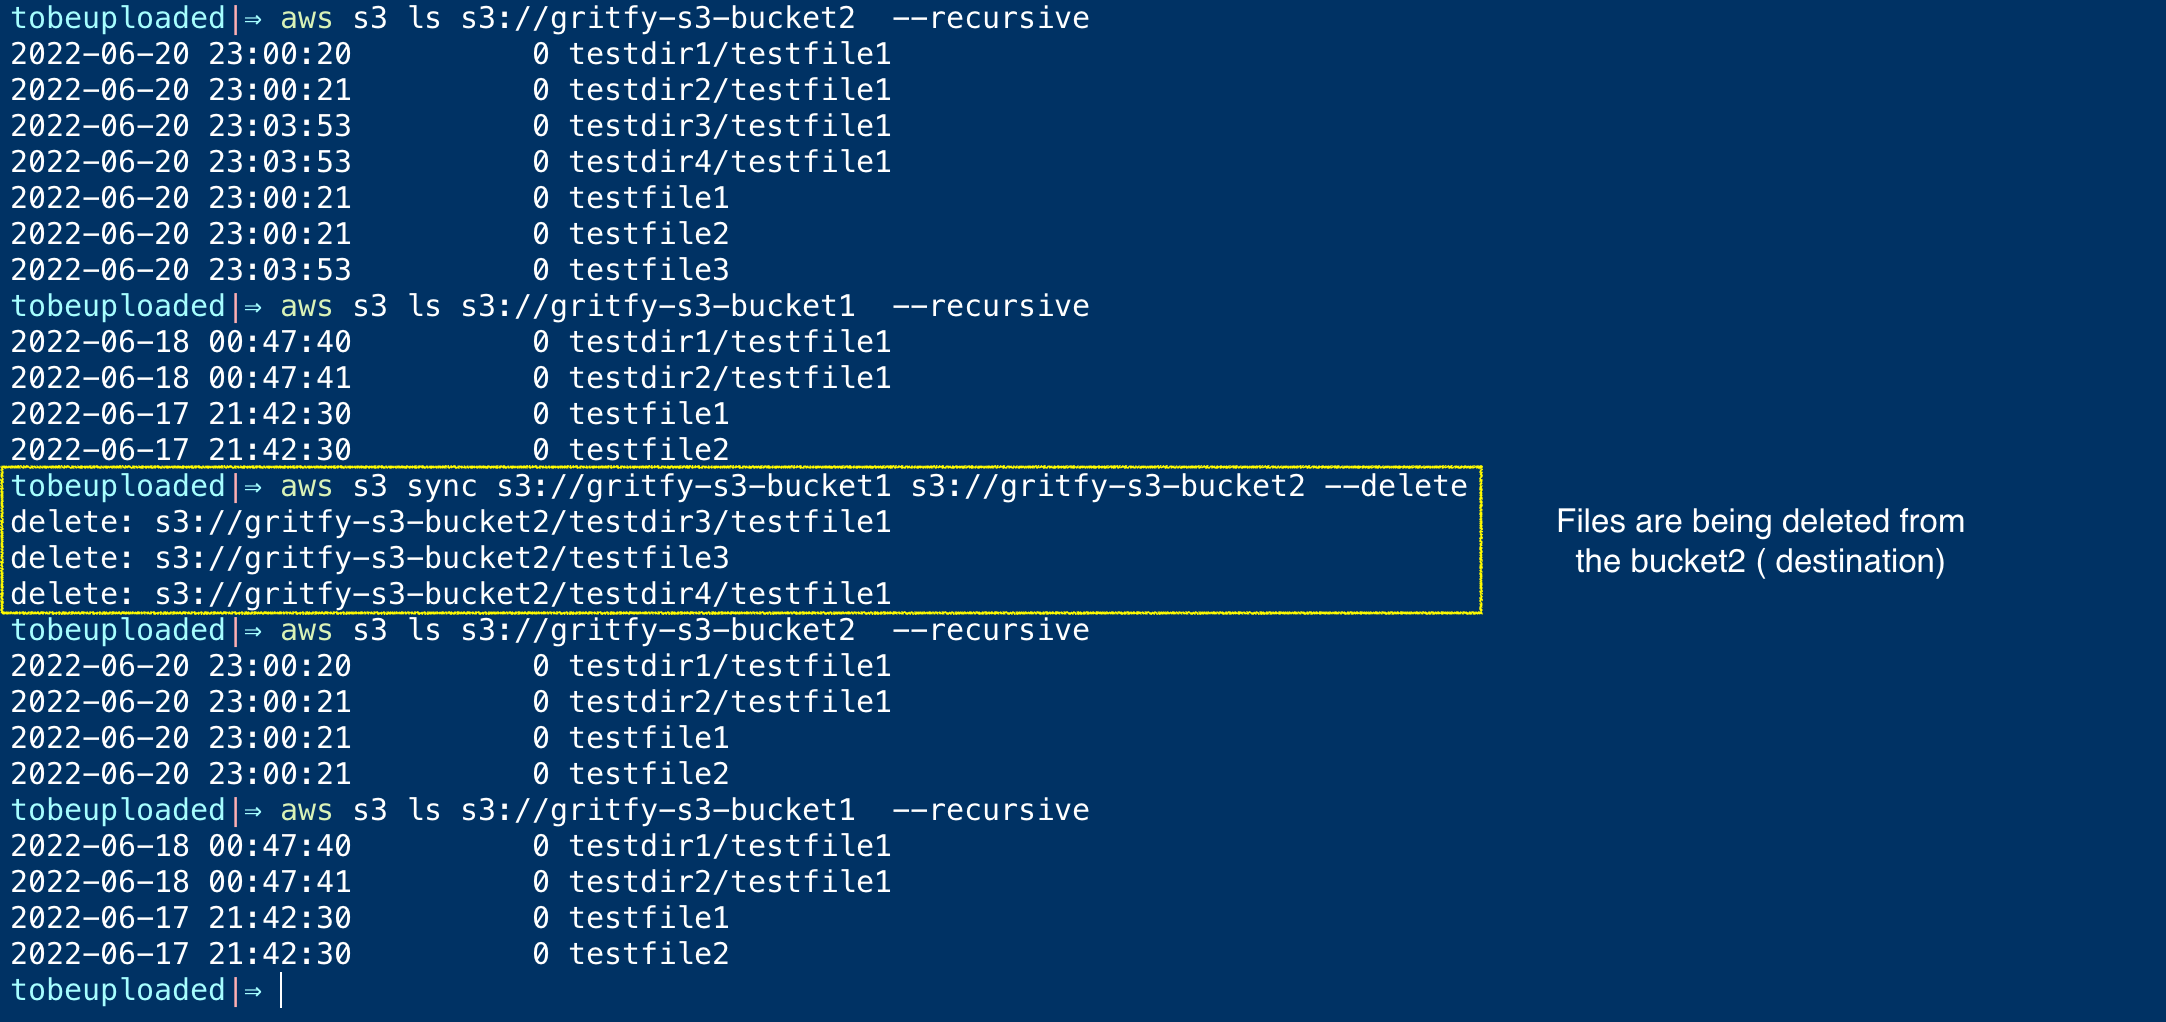
bucket1 is having the following files and directories
⚡ aws s3 ls s3://gritfy-s3-bucket1 – recursive
2022-06-18 00:47:40 0 testdir1/testfile1
2022-06-18 00:47:41 0 testdir2/testfile1
2022-06-17 21:42:30 0 testfile1
2022-06-17 21:42:30 0 testfile2
bucket2 is having the following files and directories
⚡ aws s3 ls s3://gritfy-s3-bucket2 – recursive

2022-06-20 23:00:20 0 testdir1/testfile1
2022-06-20 23:00:21 0 testdir2/testfile1
2022-06-20 23:03:53 0 testdir3/testfile1
2022-06-20 23:03:53 0 testdir4/testfile1
2022-06-20 23:00:21 0 testfile1
2022-06-20 23:00:21 0 testfile2
2022-06-20 23:03:53 0 testfile3
as you can see we have two directories and a file extra on bucket2 which is not present on bucket1.
If we are using bucket1 as the source and bucket2 as the destination and perform a simple sync. No action would be taken as the source files are already present at the destination.
In case if you want to make sure bucket2 is exactly the same as bucket1. you should delete the extra files on the bucket2
--delete option can help here. we have seen how it works earlier too.
It deletes the files on the destination which are not available on the source
In the preceding screenshot, you can see while performing the sync, the extra files on the destination are removed.
Note*: You can also use an S3 access endpoint in place of the S3 bucket URL.
Hope you have learnt how to perform aws s3 sync between two buckets.
AWS S3 Sync - Exclude and Include files
we have seen so far how to upload/download files and how to sync local path and S3 bucket and also two s3 buckets.
sometimes we might not want all of our files to be considered while performing the sync
for example. let's say you have a directory with various file types like pdf, jpg, png, txt etc.
You are interested in uploading only the image files. how would you do it?
there are two special options that you can use --exclude and --include
let us see how it works
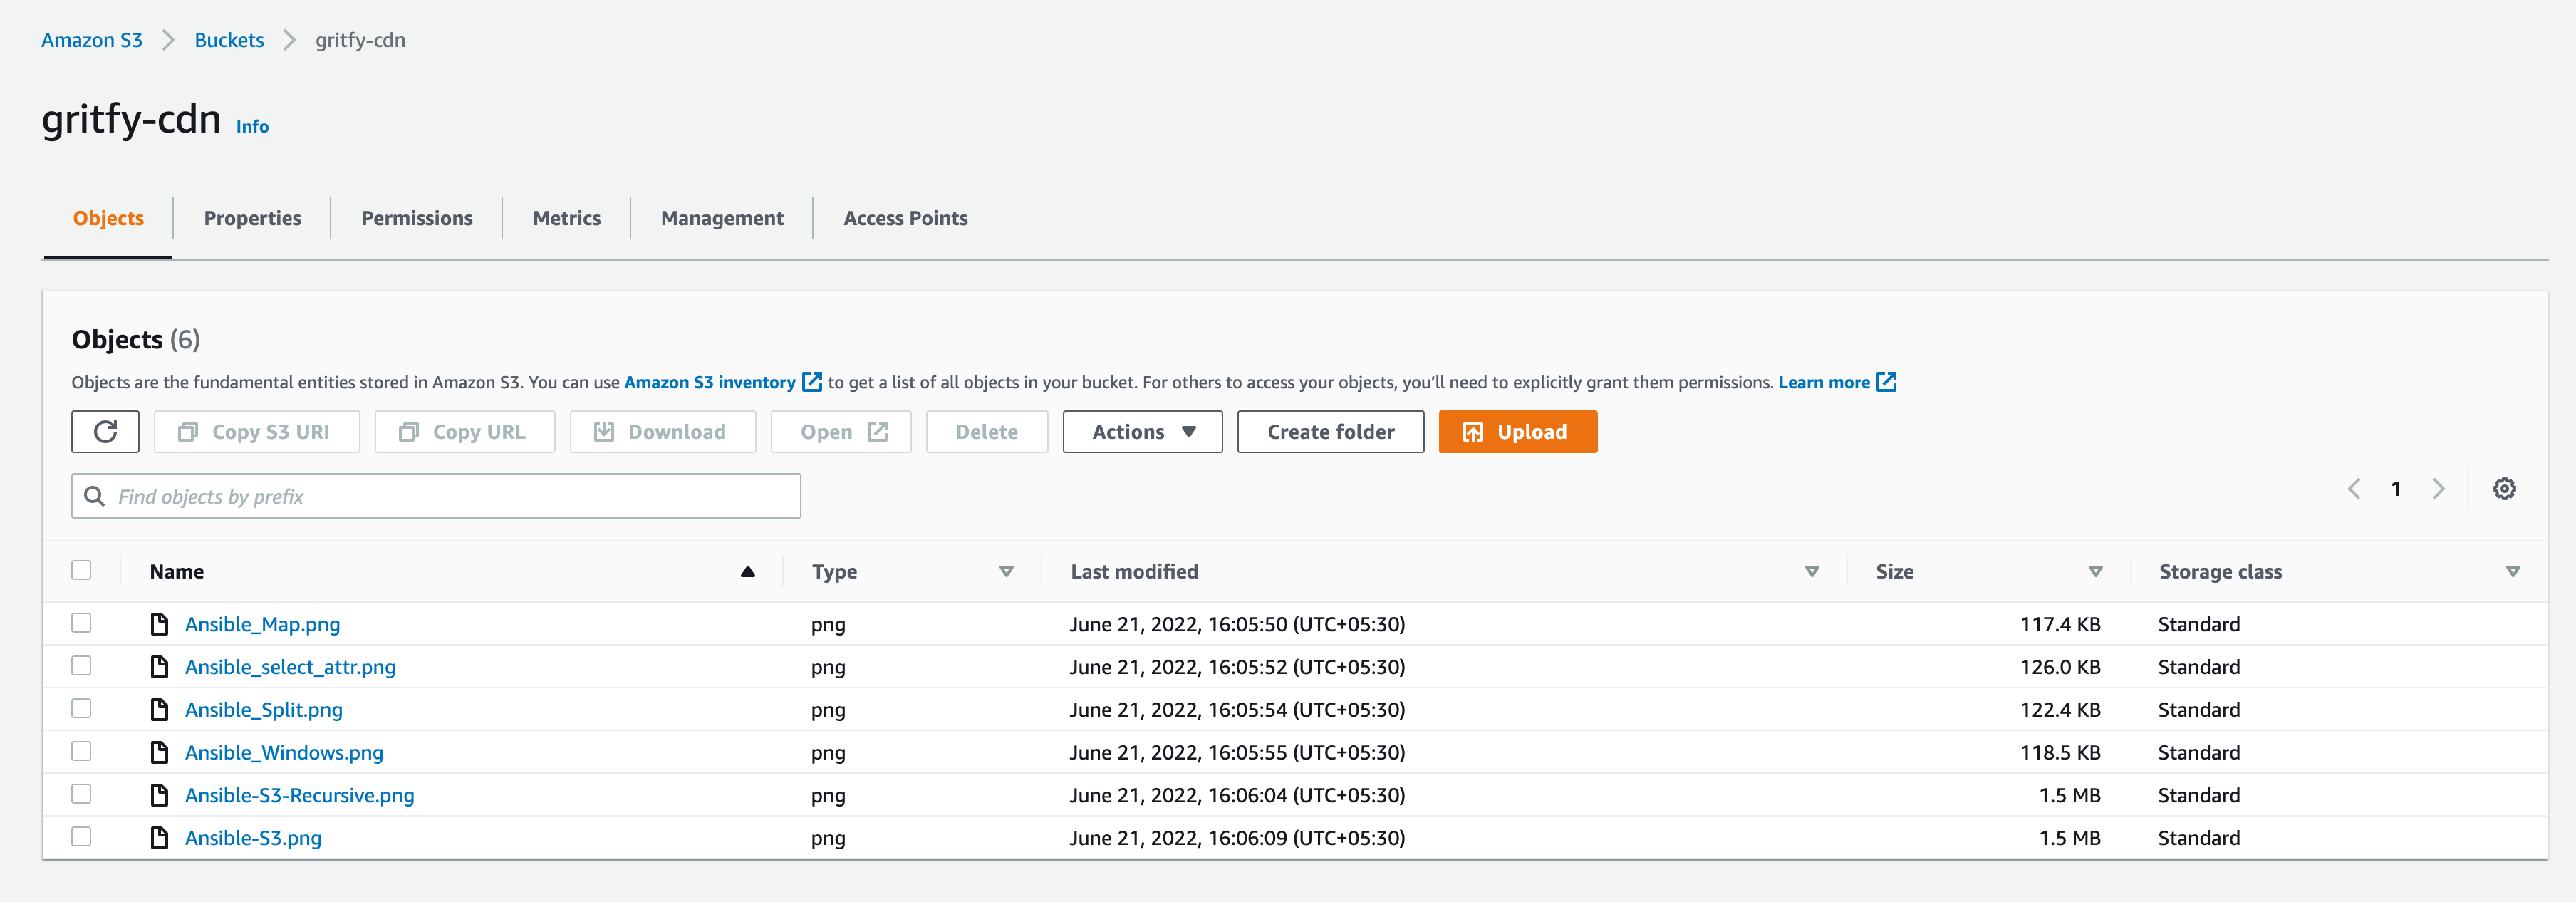
I have a s3 bucket, used as a backend for the CDN ( Content Delivery Network) with images.
I have some files on my local and want to upload (sync) only the image files from Local Path(source) to the s3 bucket (destination)
Look at the following directory listing where I have a variety of files pdf, jpg, png, txt
⚡ ls -lrt
total 0
-rw-r--r – 1 sarav staff 0 Jun 21 11:35 test.jpg
-rw-r--r – 1 sarav staff 0 Jun 21 11:35 test1.png
-rw-r--r – 1 sarav staff 0 Jun 21 11:35 test3.pdf
-rw-r--r – 1 sarav staff 0 Jun 21 11:35 test.txt
-rw-r--r – 1 sarav staff 0 Jun 21 11:36 test2.jpg
-rw-r--r – 1 sarav staff 0 Jun 21 11:36 test2.png
-rw-r--r – 1 sarav staff 0 Jun 21 11:36 test1.pdf
-rw-r--r – 1 sarav staff 0 Jun 21 11:36 test1.txt
Let us see how can I sync (upload) only the image files. with extension jpg or png to our s3 bucket
see it in action here.
As you can see on the terminal record, we are including and excluding certain files using --include and --exclude
To include only image files, you need to exclude all the files first and include only images like this
⚡ aws s3 sync . s3://gritfy-cdn – exclude "*" – include "*.jpg" – include "*.png"
to exclude certain files only you can simply use exclude alone
⚡ aws s3 sync . s3://gritfy-cdn – exclude "*.txt"
You can use multiple --include and --exclude as per your requirement
Read more about include and exclude filter here
Conclusion
In this article, we have learnt various use cases and examples of aws s3 sync such as
- How to upload a directory recursively to S3 using aws S3 CLI
- How to download a directory recursively from S3 to local using aws S3 CLI
- Syncing Local and S3 buckets and uploading/downloading the files
- Source and Destination importance in the S3 command
- Sync and delete the extra files at the destination
- Syncing two S3 buckets and deleting extra files using aws s3 sync etc
Hope this article helps.
If you have any requirements in Cloud and DevOps or Product Development. For Free Consultation reach out to us at [email protected]
Cheers
Sarav AK

Follow me on Linkedin My Profile Follow DevopsJunction onFacebook orTwitter For more practical videos and tutorials. Subscribe to our channel
Signup for Exclusive "Subscriber-only" Content

