Ansible Sudo or Ansible become Introduction
Ansible Sudo or become is a method to run a particular task in a playbook with Special Privileges like root user or some other user.
In the earlier versions of ansible there is an option named as sudo which is deprecated now, Since ansible 2.0 there are two new options named as become and become_user
Let's suppose you want to run a task on the remote server to install some packages using yum. It's very obvious that you should become root user as Non-Root user cannot install packages, in this case, you can use ansible sudo. To be precise ansible become method
Now, Let's discuss another requirement where you have to start a WebSphere application server instance on the remote machine which runs as wsadmin user. In this case, you might want to restart the instance as wsadmin only for which you can execute your ansible task with become-user method
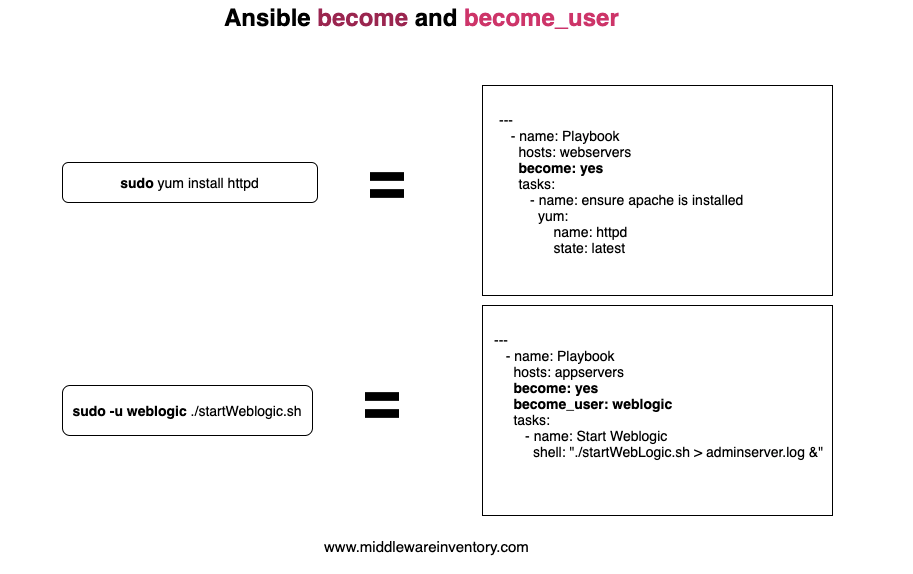
become and become_user both have to be used in a playbook in certain cases where you want your remote user to be non-root.it is more like doing sudo -u someuser before running a task.
When you are not defining the become_user and just use become. Ansible will perform the basic sudo and it will execute the corresponding task as root user
The following diagram can help you understand this better.
Run a Task with sudo - Ansible become
sudo is to execute a task as a root user, in other words, we call it as privileged execution. If you want to execute a certain task as the root user using ansible just become is sufficient
Consider the following playbook where I want to install and restart the apache httpd server and I have used only the become method cause I know the default become_user is root and it does not have to be mentioned
---
  - name: Playbook
    hosts: webservers
    become: yes
    tasks:
      - name: ensure apache is at the latest version
        yum:
          name: httpd
          state: latest
      - name: ensure apache is running
        service:
          name: httpd
          state: started
The preceding playbook is to install the apache web server and the host group named webservers and start it.
You can see that we have used only become here and have not mentioned become_user.
When become is set to yes and become_user is not mentioned the task would by default be run as root user
Run a Task with sudo -u | Ansible become_user in Playbook
Ansible become_user is to run a particular task as a specific user in general Unix command it can be done with sudo -u <theusername>
to use become_user you should also set the become to yes. become_user cannot be used without become
Consider the following example where I am trying to start a Weblogic Server Instance as weblogic user
Note*: the following playbook snippet is not complete. It would not work if you run it in your local. Refer to the complete playbook here
- name: Start the AdminServer
  tags: startadminserver
  become: yes
  become_user: weblogic
  shell: "./startWebLogic.sh > adminserver.log &"
  args:
    chdir: "{{oracle_home}}/domains/{{domain_name}}/bin/"
  register: startadminserver
  run_once: yes
  when: ansible_hostname == "{{ groups['app'][0] }}" and amprevalidate is failed
  environment:
          USER_MEM_ARGS: "-Djava.security.egd=file:/dev/./urandom"
You can see that we have to use become and become_user together and starting the weblogic application server.
You can now execute the playbook in a usual way
ansible-playbook playbook.yml
Sometimes, we might need a password to perform sudo (or) become. in such cases, we have to provide that password to Ansible prior while invoking the playbook
Ansible become with password
Consider the same playbook given below for this the only difference we are going to do is passing the password as a parameter while invoking the playbook
How to pass the password as a parameter. ansible-playbook gives you to two options or parameters to pass while you are invoking the playbook
-K (or) --ask-become-pass
Now all we have to do is starting the playbook with this option
ansible-playbook playbook.yml -K
(or)
ansible-playbook playbook.yml – ask-become-pass
this would prompt a password as you are running the command.
Ansible become in Ansible AD HOC commands
Now let us see how to use ansible become and become_user in an Ansible AD HOC commands.
In this example, we are going to access one of the privileged configuration files on the Linux server. We are going to check if the user exists by searching the /etc/passwd file. This file CAN ONLY be accessed by root or users with special privileges
Using Ansible SUDO module ( deprecated and will be removed in Ansible 2.6 )
$ ansible multi -m shell -a "cat /etc/passwd|grep -i vagrant" -s – ask-sudo-pass
[DEPRECATION WARNING]: The sudo command line option has been deprecated in favor of the "become" command line arguments. This feature will be removed in version 2.6.
 Deprecation warnings can be disabled by setting deprecation_warnings=False in ansible.cfg.
SUDO password:
mwivmapp02 | SUCCESS | rc=0 >>
vagrant:x:1000:1000:vagrant:/home/vagrant:/bin/bash

mwivmapp01 | SUCCESS | rc=0 >>
vagrant:x:1000:1000:vagrant:/home/vagrant:/bin/bash

mwisqldb01 | SUCCESS | rc=0 >>
vagrant:x:1000:1000:vagrant:/home/vagrant:/bin/bash

mwiweb02 | SUCCESS | rc=0 >>
vagrant:x:1000:1000:vagrant:/home/vagrant:/bin/bash
Using Ansible become module
$ ansible multi -m shell -a "cat /etc/passwd|grep -i vagrant" -b -K
[DEPRECATION WARNING]: The sudo command line option has been deprecated in favor of the "become" command line arguments. This feature will be removed in version 2.6.
 Deprecation warnings can be disabled by setting deprecation_warnings=False in ansible.cfg.
SUDO password:
mwivmapp02 | SUCCESS | rc=0 >>
vagrant:x:1000:1000:vagrant:/home/vagrant:/bin/bash

mwivmapp01 | SUCCESS | rc=0 >>
vagrant:x:1000:1000:vagrant:/home/vagrant:/bin/bash

mwisqldb01 | SUCCESS | rc=0 >>
vagrant:x:1000:1000:vagrant:/home/vagrant:/bin/bash

mwiweb02 | SUCCESS | rc=0 >>
vagrant:x:1000:1000:vagrant:/home/vagrant:/bin/bash
here
-b is the option for become and by default it will become root user
–K is to tell ansible to ask for SUDO password
Ansible become_user (sudo su) in Ansible AD HOC commands
In this example, we are going to create a new file inside a directory /opt/oracle which is owned by weblogic user
In the following ad-hoc command snapshot you can see we have given the username we want to switch to using --become-user=weblogic option
$ ansible app -m file -a "path=/opt/oracle/binaries state=directory mode=0755" \
-i ansible_hosts -b --become-user=weblogic

mwivmapp01 | SUCCESS => {
    "changed": true,
    "gid": 1001,
    "group": "weblogic",
    "mode": "0755",
    "owner": "weblogic",
    "path": "/opt/oracle/binaries",
    "secontext": "unconfined_u:object_r:usr_t:s0",
    "size": 6,
    "state": "directory",
    "uid": 1001
}
mwivmapp02 | SUCCESS => {
    "changed": true,
    "gid": 1001,
    "group": "weblogic",
    "mode": "0755",
    "owner": "weblogic",
    "path": "/opt/oracle/binaries",
    "secontext": "unconfined_u:object_r:usr_t:s0",
    "size": 6,
    "state": "directory",
    "uid": 1001
}
I think I have covered the various examples of Ansible become and ansible become_user module.
Hope this helps
Cheers
Sarav AK

Follow me on Linkedin My Profile Follow DevopsJunction onFacebook orTwitter For more practical videos and tutorials. Subscribe to our channel
Signup for Exclusive "Subscriber-only" Content


